Monday, March 26, 2018

DESIGNING A ROOM—YES, JUST A ROOM

Here's the problem with a long, skinny room:
You can't furnish it in a way that's inviting.
Designing a floor plan involves a lot more than getting all the rooms in the right place. Beyond merely relating to other spaces correctly, every room in a house should also stand on its own as a complete design. In other words, it should have aesthetic integrity.

Usually, this demands a room plan that's based on a primary geometric shape or a simple combination of shapes. While rectangles form the basis for most rooms, octagons, circles, and other regular shapes can also be very effective. These days, you may recall, all kinds of crazy stuff is happening in a room that's oval. Since rectangular rooms are most common, though, we'll focus on those.

Avoid trying to hide ductwork with ceiling frou-frou—
you're not going to fool anyone.
In any room, good proportions are critical to avoid a pinched, railroad-car feeling. Smaller rooms, such as dining rooms or bedrooms, should generally have length-to-width ratios of about 1:1. Large rooms such as living rooms should be more rectangular, with a length-to-width ratio of about 1.5:1. If they're any longer than this, however, they'll feel more like two conjoined rooms, which will require several furniture groupings rather than one, and thereby lose any sense of unity or coziness.

Rooms shouldn’t be disrupted by illogical projections or odd angles that destroy the integrity of their shape. Bedrooms provide a common bad example—many designers start with a nice rectangular room and then, seemingly as an afterthought, add a protruding clothes closet into one corner. The result is an awkward L-shaped space with a nasty external corner jutting into it. Lesson: closets should invariably be recessed so that they don’t interrupt the room’s basic shape. That goes for structural posts, duct shafts, and other protrusions as well. If you can't pull that off on your first attempt—try again.

Double doors look great centered
on the wall of a formal room.
Single doors, not so much.
Doorways should generally be placed snugly into a corner, not just left adrift somewhere in the middle of a wall—particularly in the case of bedrooms, baths, and secondary rooms. Formal paired doors in dining rooms, dens, and the like can be centered on the wall provided they don’t interfere with furniture placement (remember, the doors will have to stow against a wall when they’re open).

Window location is also critical to room design. A good designer will place the windows to suit the inside of the room, not the outside of the house. Fortunately, the guidelines for placements are simple: the windows should either be exactly centered, or else should clearly favor one corner or another. Anything else is liable to look like a mistake.

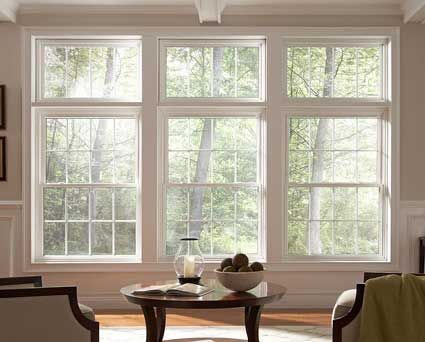
Use odd numbers of windows so there's no mullion
at the center, and keep it simple.
In aesthetic terms, a few bold windows are usually preferable to a lot of fussy little ones—less expensive, too. Single, paired, and triple windows work well; however, even-numbered window groupings other than pairs are best avoided, since they necessarily have an obtrusive mullion in the center.

Ceilings shouldn’t have illogical changes in height, such as furred-down portions meant to conceal beams, pipes or ducts. If you find yourself resorting to such last-ditch camoflauge tactics, you should probably reconsider your design. Intentional changes of ceiling height are a different matter, but even they should serve some clear architectural purpose—for example, to create an intimate alcove, or to form a visual canopy above a dining room table.

The Swiss Cheese effect:
Lots of recessed lights, but why are they where they are?
Lighting fixtures are another common source of ceiling snafus. They should never be “almost” centered—the result will simply look like a construction error. On the other hand, beware of placing fixtures according to the furniture you plan to have beneath them. On paper, it might seem perfectly logical to have one fixture above a dresser, another over your favorite armchair, and a third over the bed for reading. In practice, though, your eye relates the fixtures to the ceiling, not to what's under them, so more often than not such an arrangement just looks haphazard. A better approach is to judge the fixture locations in the context of the ceiling plane. This is especially crucial with recessed lighting fixtures in order to avoid the dreaded "Swiss cheese effect".


Monday, March 19, 2018

EXPENSIVE INCHES

It's no big deal to replace a window with french doors—
as long as you stay within the original window opening
and just remove the wall beneath.
Widen the opening, however, and your'e talking $$$$.
Everyone knows that grandiose plans are expensive. But big costs can come in small increments, too: often, a matter of a few inches one way or the other can turn a bargain design into a bank-breaker. Spotting those expensive inches is crucial to optimizing your remodeling dollar.

Take a minor remodel such as replacing a window with a sliding or French door, for example. Many people figure that, since they’re tearing up the wall anyway, they ought to widen the doorway a little while they’re at it. That’s a perfect example of expensive inches. 

Design your kitchen with modular cabinet dimension in mind
and you'll save a ton of money over custom cabinets.
It's simple— just keep everything in multiples of 3".
Why?  Because the top of every window and door opening is spanned by a heavy wooden beam called a header, which continues into the wall a few inches on either side and extends nearly all the way to the ceiling. To accommodate wider doors, this header usually has to be torn out and replaced, requiring vastly more demolition and repairing of finishes, and hence adding lots of needless expense. 

The same job can be done for a lot less if the new doors are designed to fit entirely within the existing opening, thus preserving the header and the surrounding framing. In most cases, you won’t lose any functionality by doing so: the rough framing of a typical 6’ wide sliding window, for example, will handily accommodate a pair of 2’-10” french doors or a 6’ sliding door simply by removing the section of wall beneath the window.

Remember that all building materials,
such as sheet mirrors, come in standard sizes.
When you exceed them, even by a half-inch,
you're going to pay a lot more.
Kitchen remodels also contain some notoriously costly inches. For example, lowering a standard 36” high countertop “just a bit” may seem innocuous by itself, but may in turn force you to use custom-built cabinets rather than the more affordable modular kind. Deviating from the standard 3” width multiple used in modular cabinets can have the same result. So don’t be too cavalier about requesting nonstandard dimensions—while practically anything can be custom-built to your exact specifications, you’ll pay a heavy premium for it. 

In fact, sticking to standard sizes and heights will go a long way toward keeping a tight budget under control no matter what the project. Special sizes inevitably add cost, so try to become familiar with the standard building material sizes before you start your project, and work within those limits wherever possible. 

Sometimes, though, people don't add enough
inches—a small pop-out addition
such as this one will cost a fortune
relative to the space it adds.
Standard sizes even apply to a lot of materials most people consider “made to order”.  The sheet mirror typically used above bathroom vanities, for example, is stocked in 42” widths. Anything wider—even by half an inch—requires that the mirror be cut from stock the next size up.  And of course, you pay for the wasted mirror glass as well as the part you use.
  
Alas, the law of expensive inches can work in reverse as well: it can be just as bad not to add enough of them. For example, clients often ask me to enlarge a bedroom by “just moving the wall out twelve inches or so,” mistakenly thinking that moving a wall a small distance is cheaper than moving it a lot.  In reality, of course, the wall doesn’t get “moved” at all; it simply gets demolished and replaced by a new one. And since the cost of building a new wall is about the same regardless of where you put it, you’ll lower your square-foot building costs considerably by enclosing a big area rather than a small one. 

Monday, March 12, 2018

HOW TO DESIGN, AND HOW NOT TO

Even the mighty Frank Lloyd Wright didn't waste time
doing fancy drafting when he was still hashing out ideas.
This one eventually turned into Fallingwater.
Lots of my clients hire me to review designs which they’ve drawn on a do-it-yourself computer drafting program or, worse, painstakingly drafted by hand.  They usually put enormous effort into drawing fastidious little toilets, curtain rods, and so on, trying to make the plan look “professional”, while paradoxically, they put comparatively little thought into the design itself.   

That’s a big mistake. In order to produce a really well thought-out design, you have to explore lots and lots of different schemes—what architects call iterationsThis in turn means you shouldn’t spend a lot of time drawing up any one scheme until it’s clear you’re close to a solution. It’s much better to end up with a whole pile of messy solutions that work than to produce one spotless drawing that's a loser.  
The Swiss architect Le Corbusier was renowned for his
scribbly sketches, which he never hesitated to include
as illustrations in his numerous books.

 When a person invests a lot of time in a drawing—say, a floor plan—they have a natural tendency to covet it, regardless of how rotten a solution it really is. Then, when some glaring error is pointed out, they become defensive, since they’ve probably just wasted their last eight weekends slaving over a drawing that’s fatally flawed. 

“Your bathroom opens onto the dining room,” I’ll say to a proud client.  “We’ve got to fix that.”  To which they invariably moan, “Oh, no!  I spent so much time on this drawing!”  

Your best friends—lots of cheap paper,
a waste basket, and a willingness
to keep on trying.
If you’re thinking of building an addition (or a whole house) and want to explore  a few design possibilities—whether to save on architectural fees, or just to give your architect a starting point—try the approach many architects use:

• Don’t do initial design sketches on a CAD program—you'll spend most of your effort trying to make the drawing look good, which is a waste of time at this point. Draw on paper. But don't draw on expensive paper, either. Draw on flimsy tracing paper (available in art and drafting supply stores in 12”x50’ rolls). Why? First of all, it’s cheap, and you won’t feel guilty tossing wads of it into the recycling bin as you search for a solution. Second, since tracing paper is transparent, you can overlay your basic sketches without having to draw the whole blasted thing over and over again. You can focus on just the parts that still need work.  

•  Do try lots and lots of quick, sketchy solutions. Don’t waste time making your drawings look tidy; regardless of what your first-grade teacher may have told you. Neatness is unimportant at this stage of the game. The more schemes you try, the more likely you’ll converge on a good solution.


Multiple design sketches can help you
sort out what works, and what doesn't.
•  Don’t get mired down in one basic approach. This is a deadly trap for neophyte designers. You end up drawing the same basic solution over and over again, perhaps with trivial variations, while possibly overlooking one or more completely different—and better—solutions. If you don’t seem to be moving forward, quit. Take the problem up again the next day when you’re refreshed, and try to take a whole new tack on the problem.

•  Finally, don’t get too attached to your sketches. Remember, they’re a means toward an end, not a work of art. Yes, you've probably spent dozens of hours on your design and, yes, it hurts when people point out shortcomings—but you should always be willing to take criticism, whether from your architect, your spouse, or your twelve-year-old. The end result will just be that much better.

Monday, March 5, 2018

BUILDING MYTHS

Back-to-back bathroom plumbing: It's fine if you can do it;
otherwise, forget it.
Certain fallacies have been repeated so often that people now accept them as fact—“urban myths,” some call them. No doubt you’ve heard the one about the lady who tried to dry her poodle in the microwave. It never really happened, but it’s been repeated so often that many folks think it did.

Architecture and planning have their own truisms—"building myths", if you will.  While they lack the high drama of exploding poodles, they’re equally nonsensical. Here are a handful that spring to mind:
A kitchen design with the wall ovens next to the
refrigerator: If your appliances don't mind,
why should you?

•  “Bathrooms should be designed back-to-back to save plumbing costs.”  This truism no doubt has its roots in commercial construction, where identical bathroom groups are endlessly repeated, and back-to-back planning can in fact yield real savings. While it may save a little money in residential design, too—to the tune of a few hundred dollars—it’s simply not worth straightjacketing a floor plan for such a trivial saving. The frequent corollary of this argument, "All the plumbing bathroom plumbing should be located in one wall," is equally invalid for the same reasons. There's no need to line up fixtures on one wall if some other arrangement works better.

•  “When laying out a kitchen, don’t put the oven next to the refrigerator.”
Some copy-starved home magazine probably engendered this planning myth. Ovens make heat, the reasoning goes, and refrigerators make cold—put the two together and all thermodynamic heck will break loose. As kitchen design problems go, however, this one is a non-starter. Refrigerators generate plenty of heat on their own—that’s how they cool the food inside—so a little more heat from baking a meat loaf now and then won’t make any difference. Given a lack of other options, placing these two appliances side by side will work just fine. Same goes for refrigerators and dishwashers.   

Second story additions: Not nearly as simple as they look.
(Image courtesy of ctabuilds.com)
•  “Adding a second story is the cheapest way to gain space.” Far from it. If your property is big enough, an addition at ground level will usually be both cheaper and less traumatic than adding a second story. “Going up” has other potential pitfalls as well. A second story addition demands a logically-placed staircase—something many existing floor plans can’t accommodate without coming off half-baked. Moreover, if your present foundation isn’t adequate to carry an additional story—many aren’t—you may need to reinforce it, often at a cost of tens of thousands of dollars.     

If there’s nowhere else to go but up, a second story addition is the ticket; otherwise, look into other options first.

Worn-looking roof shingles: They may be ugly,
but that doesn't mean they're going to leak.
•  “Paint is a great way to update your home’s look.”   This advice invariably appears under a headline announcing, “The Latest Color Trends!”  Trendy colors will update your home’s look, all right—until next year’s color fad blows into town.  If you really want a timeless color scheme, eschew the pronouncements of fashion- industry tastemakers, and choose colors based—gasp!— on your own preferences.  If you don’t trust your ability to choose or combine colors, by all means, hire an interior designer or color consultant to help you; but make it clear that you don’t want yet another trendoid color revamp.

•  “If your roof looks worn, it’s time for replacement.” Rubbish. I’ve railed against this misconception for years, but I’ll repeat myself one more time: If a roof doesn’t leak, it doesn’t need replacement. The way it looks is no basis for judging its watertightness. If your roof is so ugly you can’t stand the sight of it, that’s another matter. But don’t confuse appearance with performance.