Monday, May 23, 2016

BLUEPRINT READING: A Primer

Whenever it comes time for them to review their completed construction drawings, many of my otherwise poised clients begin to blanch and sputter protests like, “Oh, don’t even bother showing me those, I have no idea what they mean.”  But that’s a little like signing a contract without reading it. How do you know what you’re getting into?

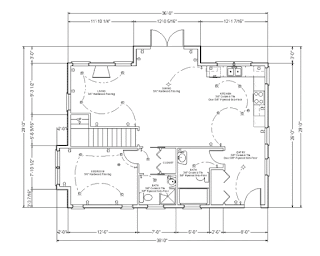
A simple floor plan with dimensions.
Remember, though, that there are many
different types of plan drawings.
Since an architectural drawing is in fact a legal contract —a graphic rather than written one—it’s very important that a homeowner be able to “read” it.

The good news is that architectural drawings are not that mysterious.  If you can live with the concept of using two dimensions to represent three, the rest is easy.  There are only three basic types of architectural drawings:

•  The first type is called a plan. A plan is any view looking straight downward. The best-known of these is the floor plan, which cuts an imaginary horizontal slice through a house in order to show walls, doors, and the like.  But there are many other kinds of plans. For example, a site plan shows the property that the house will be built on; a foundation plan shows the concrete foundation; an electrical plan shows the location of lighting fixtures, switches, and receptacles; and a roof plan shows the roof surfaces and how they intersect.

Elevations: Front, right, rear, and left, though
in this case, they're labeled by compass direction.
•  The second type of architectural drawing is called an elevation. It shows the house from the side rather than from above. The most common kind is an exterior elevation, which shows the exterior of each side of the house. The standard sequence for a complete set of exterior elevations shows the front, right, rear, and left sides of the house.

There are two other types of elevation:  An interior elevation is used to show interior features like fireplaces or archways, or other features that can’t be fully described in a plan alone.  For example, the floor plan may show an arch, but what kind of arch?  Round, square, elliptical, segmental, Moorish?  The interior elevation helps clarify such features.

Finally, a cabinet elevation (also called a casework elevation) shows the cabinetwork as seen from the front. While a kitchen floor plan can show the basic location of cabinets and counters, a cabinet elevation is needed to show the exact size and location of cabinet doors, drawers, shelves, and the like.  It’s typically drawn for kitchens, bathrooms, and any other complicated interior areas.

A simple section drawing. In this example, it's fairly easy
to recognize that it's a slice through the building.
•  The third and final type of drawing is called a section. Simply put, it’s a vertical slice through the house. To picture it, imagine taking a giant saw and cutting the house in half vertically. The resulting dollhouse-like view lets us actually look inside of walls, attics, and crawlspaces, so it’s useful for showing the house’s structure and other features that can’t be seen from outside.

For most people, sections are the most difficult drawings to read.  Unlike plans and elevations, they don’t always look like a recognizable part of a house.  But once you get used to the concept of cutting slices through the house to see what it’s made of, you’ll find yourself reading them like a pro.

•  Finally, any one of these three drawing types can be used to zoom in on a particular aspect of the building to show it more clearly.  The resulting larger-scale drawing is called a detail.  For example, an unusually-shaped rain gutter may be too small to distinguish on a section, so the architect draws an enlarged version of the gutter to describe it more clearly.

Monday, May 16, 2016

PLANNING OUTDOOR ROOMS

A beautifully defined outdoor room. The low wall provides
a sense of enclosure (as well as extra seating)
without obstructing the garden view.
What’s an “outdoor room”?  No, it’s not one of those aluminum p aluminum patio covers people had in the Sixties.  In architecture, an outdoor room is a living area that relies on landscape elements instead of walls to provide a sense of enclosure.

Considering the expense of real estate today, it’s surprising how few people fully utilize their land for outdoor living space.  Properly-planned outdoor rooms can make a small home seem much larger, and at very reasonable cost.

An outdoor room requires all the same niceties as an indoor one: Sunlight, comfortable furnishings, privacy, and convenient access. Just think of it as an integral part of your home’s floor plan.
Here are a few design tips:

A pair of doors leading out in the bare minimum—
and the bigger the better.
• Locate outdoor rooms in the areas that receive sunlight throughout most of the day—yes, even if you live in a hot climate.  You can always create shade if you need to, but a shadowed area will be unalterably drafty and uninviting during most of the year.

• If you’re planning several areas with different times of usage—for example, a small deck for breakfasting, and a patio area for afternoon barbecues—orient them where they’ll receive sun during the time of use.

•  Minimize negative space. An area with a strong sense of enclosure—one based on a circle, for example—is termed a positive space.  Negative space is what’s left over from it, like the pointy scraps of dough left over from cutting out cookies.  These harsh, spiky areas are uncomfortable to be in, and they’re also hard to utilize.

Therefore, banish angles with less than 90 degrees when laying out planting beds and paved areas. Narrow dead-end alleys, sharply converging slivers of ground, and other leftovers should be avoided. Any such areas that remain can be filled with planting.

Paving patterns are one way to define outdoor areas,
but don't rely on them too much. .Where possible, try to add
changes of level to introduce a third dimension.
•  Use different paving materials to define areas.  So-called hard materials such as concrete, brick, and redwood decking can be contrasted with soft materials such as lawn or ground cover to avoid a barren, hard-edged feel.

Adding changes of level is an even more effective way to delineate different outdoor rooms. A few steps in a logical place will also add interest and help avoid the two-dimensional effect of using borders alone.

•  Use generous openings to access the outdoor room directly from an interior living area, perhaps using a sliding door or a pair of French doors. Direct and generous access is critical, since an area that’s difficult to reach will seldom be used. Adding doors to the garden has an another benefit as well:  By visually incorporating the outdoors, interior areas will appear more spacious.
If there are neighboring houses that look out
onto your outdoor room, make sure you provide
some privacy screening. It won't be comfortable
to spend time there if you feel you're on display.

•   Lastly, provide for privacy. To be comfortable, at least part of your outdoor room should be screened from the view of your local gawkers.  Tall planting, a lattice screen, or just a good old-fashioned fence will fill the bill.  Or, build a trellis or gazebo to provide a private retreat from the main outdoor area.